I had the privilege of attending the 20th Annual Spring Conference of the Organic Growers School last weekend in Asheville, NC. This is my second year attending the event, and I can’t imagine ever missing it. I learn so much at this conference. Between the wonderful, knowledgeable people, fantastic class topics, and beautiful surroundings, this event has quickly become a highlight of my year.
This year I took classes on Beekeeping, Mushrooms, Goat Cheese Making, and Composting. I thought I should impart some of the things that I learned from these classes for those that didn’t get to attend. So here’s the first in my OGS series of articles – Beekeeping.
I’ve had beekeeping in the back of my mind for a while now. I feel like its important to keep bees for several reasons, but primarily for me it is for pollination and honey. I live in a rural area where there are a lot of small farms and tons of backyard gardeners. I know that having a couple of hives of bees will not only help my garden pollination, but it will also benefit everyone growing in a 3 mile radius of my hives.
Last year at OGS I took a class on mead-making. Since that class I have been cheerfully experimenting with making mead using honey from a local apiary that sells me one gallon of honey for $40. That’s not a bad price at all, but I want to really ramp up my mead making this year, and that is going to get costly at $40/gallon.
So I have a need for producing my own honey and keeping my own bees. That being said, I’ve drug my feet about it because of expense, time commitment, and fear of bees. The classes at OGS have alleviated all of these fears.
Lets start with some basics:
- One of the best pieces of advice I got from both of the beekeeping classes I took was to get plugged into your local beekeeping clubs/organizations and to go visit other beekeepers hives with them. Both classes stressed the importance of getting to know bees and how to behave around them by apprenticing with a local beekeeper in your area. Not only will you learn a lot of technique, you will also get more comfortable dealing with the bees. This should help me get over my fear of bees.
- Both classes stressed the importance of being calm when working with the bees. The first workshop recommended doing yoga or meditating right before entering the bee’s space. They claimed that the bees will respond to your energy in kind. Mary Beth Gwynn said that she often stands with her hand on the top of the hive for a couple of minutes to allow the bees to get used to her before she enters the hive.
- When do you get bees? Well, it depends on your environment of course, but the general rule is that you order bees between November and February. That being said, if you hope to acquire bees through a swarm, that usually happens around April through June.
- Where do you get bees? You can order packages of bees or nucs of bees from apiaries, or you can acquire swarms or splits from other beekeepers. Everyone seems to agree that purchasing a “nuc” of bees is the best way to get bees. Whichever source of bees you choose, you should get two hives of bees as a minimum.
- Nucs are small, established colonies of bees that can be slipped into your hive and are ready to go. They are bees that have already been living and working as a hive.
- If you buy packaged bees, you are getting an odd assortment of bees from many different hives and a queen none of them have ever met before. The quality of the bees is in question with this method, and it can take a while for all of the bees to decide to work together.
- Splits of bees can be acquired from your local beekeeper who has a full hive and wants to avoid a swarm. You can find out about getting a split through your local beekeeping association/club.
- Swarms are essentially free bees. Get on the swarm list through your local beekeeping association or extension agency. They will call you when they are going out to get an unwanted swarm from someone’s home. You show up, collect the bees (a Nuc box is perfect for this), and take them home to your awaiting hive. This is a great way to get free “survivor” bees.
- What are “Survivor Bees”? The classes I took on beekeeping were on “Natural” beekeeping. Meaning no medications, pesticides, or chemicals are used on the bees. This style of beekeeping is also known as “Live and let die,” meaning that only the strong bees will survive to breed. If your bees die, well, then they weren’t the strong bees you want to procreate. Natural Beekeepers hope that if enough beekeepers practice natural beekeeping, eventually bees will be bred for natural resistance to varoa mites and other diseases.
- Expense – there are predominantly two types of bee hives: Langstroth hives and Kenyan Top Bar hives. The two are very different and cost is just one of the ways they differ. Top Bar hives are significantly cheaper than the more classic Langstroth boxed hives. Here’s why:
- Langstroth Hives are the classic bee boxes you see whenever you think of beekeeping. Generally there is a large brood box topped by a series of further brood frames and honey frames. This style of beekeeping yields a lot of honey and allows for a large, expandable hive.

A downside is that these boxes get very heavy when full of comb and have to be moved to inspect the lower boxes. These boxes use frames with starter comb that the bees build upon. To harvest the honey the frames are removed, the caps are sliced off and the frames are spun in a honey extractor. The empty combs are then returned to the hive so that the bees can refill them with honey. This is a great energy saver for the bees, but can also keep diseased wax in the hive.
These hives usually have 8 or 10 frames per box, and are usually 4 or 5 boxes high for a full hive of bees. As production of honey ramps up, additional boxes with the frames can be stacked on top to help the bees expand their production.

- Kenyan To Bar Hives have one long box that is shaped like half a hexagon. Viewed from an end it looks like this: \_/. Then there is some sort of slightly pitched roof that just rests on top of the hive.

Instead of frames, a TB hive uses bars that are set on top of the hive. The bees make their comb directly on the bars. The main job of the beekeeper with this style of hive is to ensure that the bees build straight combs and to reshape any curved comb. The bees will naturally build their brood combs on the first couple of bars, and will leave the honey combs to the rest of the bars.

One of the downsides of this type of hive is that you will be able to harvest a lot less honey. This is because you will not be reusing comb, so the bees will spend a lot of their energy making comb. it takes 8 pounds of honey to make one pound of comb. The comb is not reused because they are more fragile hanging from the top bar.

To extract the honey, the comb is crushed and strained. Tom Knaust (who taught the Top Bar class I took) recommended taking two 5 gallon bucked, drilling holes in the bottom of one bucket and stacking that bucket on top of the other. Then place a strainer on top of the buckets and crush the comb in the strainer. This method allows you to have strained honey and a bucket full of bees wax.

So this method will provide you with less honey, but it is also a lot cheaper to get started because you can construct your own hives and cheaply extract the honey. Cost estimates for starting out with two hives runs roughly $300 for Top Bar hives and $1,000 for Langstroth hives.
Other benefits of Top Bar hives is that they tend to house happier, healthier bees. Top Bar bees seem to be less susceptible to diseases. They tend to be happier bees, because you are not changing their temperature when checking on them, the way you are when you are breaking down the chimney of the Langstroth hive.
After taking a class on both I think that I will try Top Bar hive beekeeping. It is a method that I can start cheaply and right away. It does take a little more time and management on my part, but right now I have more time than I have money. Also, I only want a couple of hives for home use, so not harvesting as much honey as I might with a Langstroth hive is not such a large detraction.
The following are a series of resources I acquired at the the classes:
BOOKS
The Practical Beekeeper (several volumes) by Michael Bush. Bush also provides a lot of fantastic content for free on his website: www.bushfarms.com/bees
Natural Beekeeping: Organic Approaches to Modern Apiculture by Ross Conrad.
Honeybee Democracy by Thomas Seeley
Top Bar Beekeeping: Wisdom & Pleasure Combined by Wyatt A. Mangum, PhD. This is THE comprehensive text on keeping Top Bar hives.
The Barefoot Beekeeper by P.J. Chandler
Top Bar Beekeeping by Les Crowder
WEBSITES
http://www.biobees.com/ – source for free step-by-step instructions on how to build a horizontal top bar hive, and loads of information about top bar beekeeping.
http://www.anarchyapiaries.org/ – is filled with interesting thoughts and lots of info on keeping bees in alternative hive structures.
http://www.beesource.com/ – all things bees
http://www.bushfarmscom/bees.htm – a wealth of experience-based knowledge with great photos.
http://www.tbhsbywam.com/ – top bar info and links to buy the bible of top bar beekeeping by Wyatt Mangum (see books above.).
http://www.holybeepress.com – This is Debra Roberts’ (who taught my beekeeping workshop) website
http://www.fortheloveofbees.com – this is bee book author, Les Crowder’s website.
http://www.naturalbeekeepingtrust.org – home of the Natural Beekeeping Trust
http://www.brushymountainbeefarm.com/Resources – offers fantastic text resources, pictures, and video classes for beekeepers from beginner to commercial beekeepers.
https://www.youtube.com/user/FatBeeMan – this is Don Kuchenmeister’s YouTube channel. He has tons of practical, how to videos.
FORUMS
http://www.beesource.com – go to “The Exchange” for their forum.
del.icio.us Tags:
OGS,
Organic Growers School,
Bees,
Bee Hives,
Hives,
Beekeeping,
Top Bar,
Kenyan,
Langstroth,
Honey,
Organic,
Natural,
Comb,
Extraction,
Harvest,
Homesteading,
Hobby,
Beekeeper,
Swarm,
Colony,
Varoa,
Mites
 Chanterelles – contain a cancer-fighting enzyme, are high in beta carotene and vitamin D if grown exposed to light for a couple of hours a day.
 Cordyceps mushrooms – are an immune system stimulant that is frequently given to people undergoing surgery.These mushrooms are also carnivorous! They attack and eat insect pupae and the mushrooms frequently sprout out of the back of the pupae’s head. Gnarly! Some of these mushrooms can be used to kill fire ants, squash bugs, aphids, etc. Think of the gardener’s who could use this fungus! Cordyceps Ophioglossoides has been shown to stimulate adult brain cells to grow. It is being researched on its ability to reverse brain diseases like Alzheimer's.
  Lion’s Mane (Hericium Erinaceus) – cook this mushroom to release a nerve tonic
 Psilocybin (Magic Mushrooms) – are currently being studied at Johns Hopkins as a treatment for addiction and PTSD. Preliminary studies has shown great promise with just one dose!
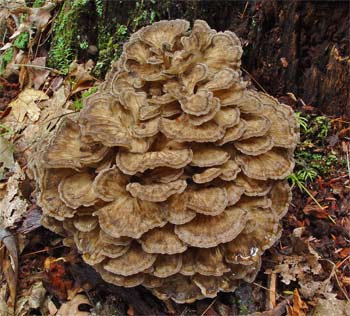 Maitake – Makes a great tea and has anti-cancer properties.
 Chicken of the Woods – kills e-coli bacteria and is a great treatment for fungal infections.
 Wood Ear – (commonly used in hot and sour soups) These mushrooms dehydrate down to a fraction of their original size, but rehydrate almost completely. These mushrooms store well and are high in anti-coagulants.
 Enoki (Velvet Foot) – is very high in anti-cancer properties.
 Almond Portobello – tastes like toasted almonds when cooked and is high in anti-cancer properties.
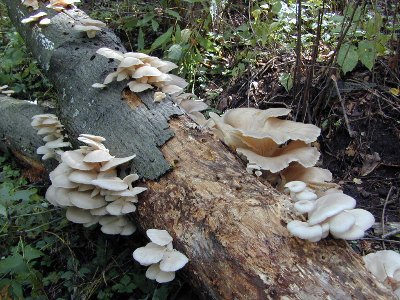 Pleurotus (Oyster) – has twice the protein of eggs, is high in psyllium, is anti-viral and anti-parasite.
 Corn Smut – a corn fungal pathogen that tends to grow on Silver Queen and other heirloom varietals. This fungus tastes like a corny guacamole and can help with uterine contraction.
 Turkey Tail – dried and powdered has been studied in its use to fight breast cancer. Seems to work as a preventative as well.
 Reishi (Ling Chi) – is known as the Mushroom of Immortality. If this mushroom is grown in light, it is more medicinal. This amazing mushroom is adaptogenic, immune enhancing/modulating, and has ganoderic acid (for diabetics). Cotter made us some reishi mushroom tea to try and it had a pleasant earthy/chocolate flavor. This medicinal can be dried and powered or extracted.


