Friday, August 17, 2012

Meads and Melomels

For the past year or so, I have been experimenting with fermentation. I've made my own beer, cider, fermented pickles, sauerkraut, and kimchi. So far everything has been a success, so why not try something new?

I recently discovered an apiary near my home (Biggers Apiaries). I purchased a gallon of Orannge Blossom honey with the vague notion of making mead with it. I attended a class on making medicinal meads at the Organic Growers School Annual Conference this year, so I pulled out my notes for review and watched a couple of mead-making videos on YouTube. (Allow me to recommend the videos of "Craigtube" and "EpicFantasy".) It looked almost too easy. I couldn't wait to get started.

Since I've made my own beer and ciders, I had all of the equipment that I needed. I was going to make gallon batches, so I needed gallon carboys, stoppers, airlocks, a large stock pot, 4 cup measuring container, cooking thermometer, and a funnel. I filled the kitchen sink with hot water and Star-San sanitizing solution. I sanitised all of the equipment while 6 quarts of water heated in the stock pot on the stove. (Bleach can be used to sanitize the equipment, but be sure to rinse everything VERY well.)

The basic formula for mead is 3 parts water and one part honey + (wine) yeast. I decided to make 2 gallons of regular mead, and 2 gallons of berry melomel (fruit meads are called melomels). So I heated 6 quarts of water and 2 quarts of local orange blossom honey in the stock pot. Heat the water and honey to 150 degrees Fahrenheit for 30 minutes, stirring periodically. This will pasteurize the honey. After 30 minutes I poured the must (the water and honey before fermentation) into two carboys. The must is too hot to pitch the yeast at this point, so I kept the bottles in a cold water bath in the sink to bring down the temperature. I also took a potential alcohol measurement with a hydrometer. The reading came to 13%. So if all goes well during fermentation, the mead should have an abv of 13%.

While I waited for the must to cool, it was time to make the second batch. Again, I heated 6 quarts of water and 2 quarts of honey to 150 degrees Fahrenheit. After the must had been at 150 degrees for 15 minutes, I added one cup of dried, organic elderberries and two cups of previously frozen blueberries. As the must cooked for another 15 minutes, the whole kitchen started to smell like blueberry cobbler.

As with the mead, I funnelled the melomel must into two 1 gallon carboys and set the carboys in a cold water bath to cool. The cooling process took a long time, and next time I believe I will only cook half the water with the honey and add the other half as cold, bottled, spring water to cool the must immediately. I took a hydrometer reading of the melomel must, and got a potential alcohol reading of 12%.

Once the musts were cooled to less than body temperature (I waited until mine was at 80 degrees Fahrenheit) they were ready for the yeast. I used Red Star Pasteur Champagne yeast. One package of this yeast is good for 5 gallons, so I mixed the yeast with one cup of warm water, and poured 1/4 a cup of the yeast mixture to each carboy. I also added a handful of raisins to each carboy to act as a yeast nutrient. I capped the carboys and gave them all a good shake to make sure everything was well mixed. Then I replaced the caps with drilled (#6) rubber and (homemade) cork stoppers and airlocks.

Twelve hours later, the carboys are bubbling and the airlocks are gurgling.

 I plan to allow the musts to sit in these carboys for a month.  Then I will siphon them off of their lees (dead yeast and fruit) and into new, sterilized carboys to sit for another month or two. At this point, I may decide to add a little additional honey, spices, or fruit to the musts. After the secondary fermentation is done, the meads will be ready to bottle, where they should sit for another four months (minimum). Meads age very well, and the rule of thumb is that a mead made in Spring will be ready for Christmas.

This is a super easy and quick way to enjoy mead all year long. As long as you have honey, water, and yeast, you can make a delicious honey wine. Skal!

Friday, April 27, 2012

Cider Started

I decided that it was better late than never to start my first batch of hard cider. Living in the deep south, we do not have the luxury of vast apple orchards from which to press delicious and unique ciders. So I made do with Motts Natural Apple Cider, which has no preservatives or added vitamin C. It wasn’t easy to find a bottled juice that was simply “apple juice.” (Martinelli’s is another brand that makes a “nothing added” apple cider.)

I made my recipe up after reading a couple of books on the subject:

  • 2 64oz bottles of apple juice
  • 1 cup of granulated sugar
  • 2/3 cup of sorghum molasses
  • 1 tsp of acid complex powder (you can get this from most brew shops)
  • 1/4 tsp of dried tannin powder (also available at brew shops)
  • 1/2 a packet of Red Star Champagne yeast
  • 1/4 cup of dried elderberries.

I poured the juice, sugar, molasses, acid powder, tannin powder, and elderberries into a one gallon glass carboy. Then I mixed the dried yeast in 1/2 cup of warmed apple juice to wake the buggers up. Once the yeast was bubbly, I poured half of it into the carboy.

Then I gave it all a good shake, installed the stopper and the blow-off tube, and set it in a cool, dry, dark place.

Hard Cider brewing 4.2012

I’ll keep the blow-off tube in place for a couple of days to make sure I don’t have an over-flow. After that, I’ll install a simple airlock. The cider will ferment in the carboy for a month or so. After that I will siphon it off into primed bottles and it will complete a second fermentation in the bottle for another month or so.

Fingers crossed that it’s not too warm in the season to get a good hard cider out of this.

Saturday, March 3, 2012

Garden Bed planted March 1st

It’s felt like the last 30 or 40 days have sped by in fast forward motion. Spring sprung and hightailed it toward summer before I even had all of my seeds started. I’m not sure what this unusually warm and dry weather will mean for my garden in the high summer months of July and August, but for right now it means I have had to speed up my efforts to get the garden growing.

In late February Max built me a raised bed and I dug it out, weeded, and laid some cardboard down to inhibit weed growth.

Cardboard bottom layer of bed 1

Then I filled the bed with tons of composted cow manure.

layer of cow manure on bed 1

On top of the cow manure I added some locally-sourced, composted horse manure. The horse manure helps to keep the soil moist in addition to adding some great fertilizer to the mix.

Bed 1 filled w.manure

Once that was all complete, I was ready to plant my most advanced seedlings. From the top of the above picture to the bottom, I planted rows of Cherokee Purple tomatoes, Dragon Tongue beans, Shallots, Sweet Yellow Onions, Purple Tomatillos, and Green Cowhorn and Burgundy Okra.

These seedlings took off immediately upon being planted in the bed. I had blossoms on my dragon tongue beans only days after getting them in the raised bed.

Blossoming Dragon Tongue Beans

This first bed took off so well, we’ve decided that we need a second one to build for more beans, peppers, eggplant, etc. I’ll have a post up soon about the next bed.

Tuesday, February 28, 2012

Worms Will Be Eating My Garbage

I checked "Worms Eat My Garbage" by Mary Appelhof out of the library so that I could prepare for starting my own worm farm. I am expanding my gardens this year, and with Florida's sandy soil, I need to find ways to supplement it. I've read that vermicomposting is a great way to produce nutrition for a garden, and that Mary Appelhof is the #1 expert on the subject.

This book could definitely use an update. It was written in 1982, before worm farms were commercially produced, before the internet, and at the start of interest in the US in recycling. I would love to see the resources section updated for the present times, and I would like to know Ms. Appelhof's opinions on the new commercially produced worm bins.

That being said, I still learned a lot from this little book. Appelhof's information on worm ecology, biology, and care is detailed and easy to understand. Her section on the other critters that are likely to live in your worm bin was also very informative.

Thanks to "Worms Eat My Garbage" I feel fully prepared for the arrival of my Worm Factory 360 and my 1800 Red Wigglers.

Monday, February 20, 2012

Grow It Forward

I just won free heirloom seeds from Baker Creek Seed Company in the Your Garden Show "Grow It Forward" contest. I can't wait to get my seeds and find out what else will be going in my garden!

Friday, February 10, 2012

The Problem with Kumquats

My neighbors have some beautiful kumquat trees. They are diminutive, with long, arching limbs that are laden with bright orange kumquats. They look so yummy, you just want to pop them in your mouth. But resist that temptation! These kumquats are so sour your pucker will pucker. Your eyes will bulge, and you will begin to drool. They are a Trojan horse for a citrus sour-bomb.

But this year, I decided to do something about our neighborhood kumquat problem. I would make these kumquats taste like candy. I would can them!

My favorite book on canning is Linda J. Amendt's "Blue Ribbon Preserves." She has three recipes for Kumquats in this book: Kumquat Marmalade, Kumquat Preserves, and Brandied Kumquats. I had so many kumquats, I decided to make all three!

I started at about four in the afternoon. I took my sack full of kumquats and carefully washed them and sorted them for the different recipes. The best looking, most ripe ones I would save for the brandied recipe.
Washed & Sorted Kumquats
Then I got the canner out, filled it with water, and started the long journey it would take to get it to boiling. I always put the canner on the heat a good 45 minutes before I am going to need to use it.

Canner and Tools
The amount of prep work canning recipes like these takes is monumental. I decided to tackle the Kumquat Preserves recipe first, since it had to sit over night to soak in the syrupy goodness.  I created a simple syrup and then tossed the kumquats in whole.

Kumquats Added to Simple Syrup
Then I increased the heat and got the fruit up to boiling.

Kumquats Boiling in Simple Syrup
They boiled for about ten minutes and then I took them off of the heat to start their over-night soaking. The scent in the house from the boiling kumquats was absolutely ambrosial. It smelled like I lived in a flowering kumquat grove. Wonderful!

Soaking Kumquats
The next recipe to tackle was the Kumquat Marmalade. This one had some serious prep work involved. I had to "supreme" six Valencia oranges (also donated by my neighbors). Supreme-ing is a huge pain in the ass, but it makes a superior marmalade. Basically, it means laboriously trimming away all of the white pith, and then cutting away all of the membranes that separate each segment of the fruit, and then chopping up the inside of each segment. It takes a long time to do this, but the flavor and texture of the marmalade will make it all worth it.

After I supremed the oranges, I had to thinly slice a couple of pounds of kumquats. This was a lot easier than the orange prep, but required concentration to make sure all of the seeds were removed.

Once the fruit is prepared, its ready for the pot. I added the kumquat slices, orange juice, water, and baking soda to an 8 quart pot and turned up the heat. I got it to a full boil and then reduced the heat to simmer the concoction for 10 minutes. Then I added the supremed orange bits, stirred and simmered for 10 more minutes.

Then I added a ridiculous amount of sugar (5 cups!) and a little butter and stirred it all up to make sure the sugar had fully dissolved. Brought it all back to a boil again so that I could add a pouch of pectin.

Boiling Kumquat Marmalade
And that's about it. After adding the pectin, I stirred the marmalade for a minute and then let it sit for 5 off of the heat before adding it to sterilized jars. Once the jars were filled and capped, I processed them in the canner for 10 minutes.

When it was all said and done, I had 7 jars of majestically golden kumquat marmalade.

Kumquat Marmalade
The third recipe I decided to try was the one for Brandied Kumquats. The only trouble was that I didn't have all of the ingredients. The recipe called for brandy and a vanilla bean. I had neither. Undaunted, I decided to substitute cognac for the brandy (my preference anyway), and vanilla extract for the vanilla bean.

First I blanched the kumquats. Then I made a simple syrup and added the vanilla. Once that syrup had simmered for 10 minutes I added the kumquats for 5 minutes. When that was up, I took the pot off of the heat and spooned the fruit (leaving the syrup) into the jars. It smelled wonderfully citrusy.

I put the syrup back on the heat and brought it to a boil for a minute. Then I took it off of the heat and added the cognac. I gave the mixture a quick stir and then ladled it over the fruit in the jars. The aroma alone was intoxicating. I processed the jars for 25 minutes.

Cognac Kumquats
Fortunately (you'll see why in a moment) I had more syrup than I had fruit. Once I had filled three pint jars, I had nearly a pint of cognac syrup left. The temptation was too great. I poured some of the hot liqueur into a coffee cup and had a sip. GLORIOUS! My new favorite winter beverage: hot kumquat cognac! Next time I make this I will intentionally increase the quantity of the syrup and can that separately.
Kumquat Cognac
This morning I retrieved the kumquats that had been soaking their syrup all night. It smelled lovely. I put it on the heat and got it up to a boil. Added a pouch of pectin and attempted to get all of the seeds out while I stirred the mixture for 60 second on the heat, and for another 5 minutes off of the heat. I got a lot of seeds, but not all. I think next time I will cut the kumquats in half and remove the seeds before they soak in their syrup all night.

Despite the seeds though, the crushed kumquats made a tantalizing preserve. I filled 6 jars and processed them for 10 minutes.

Kumquat Preserves
Canning is no small task. I worked from 4 in the afternoon to 10:30 at night without stopping. And then I spent another 45 minutes at it this morning. But despite the grueling hours, I think canning these kumquats was absolutely worth it. I can't wait to share the bounty!

Kumquat Harvest Canned

Monday, February 6, 2012

I'm a Bad, Bad Blogger

Okay, I am WAY behind on this blog, so here’s a crazy long catch-up post:

I moved from South Florida to North Florida on January 14th.  I brought the seedlings that I had started in the beginning of January (onions, cabbages, and tomatoes), my jalapeno pepper plants, black night pepper plants, mint, orchids, and chives. They all seem to be happier the new, somewhat cooler climate.

 On January 18th I managed to break the well. Not the actual hole in the ground, but the PVC pipe that carries water from the well to the house. Panic doesn’t begin to describe how I handled that situation. Luckily for me and my boyfriend, I was able to call a friend who walked me through purchasing this magic blue stuff, and applying it to the pipe and coupling.  As of this posting, the seal is still holding, and Max says that now that he knows I have plumbing skills, he’s got a long list of chores waiting for me.

Here’s a pic of my masterful handiwork.


So Max and I have already had some winter veggies started in our garden.

Bok Choy, Leeks, & Radicchio
We planted this Baby Bok Choy from seed in early November and have been eating from it since late November. What a great winter veggie! We love the Ching Chang Bok Choy. It grows fast, is hardy, and very tasty.
Bolting Bok Choy
Unfortunately, our unseasonably warm weather has caused the Bok Choy to bolt and the Radicchio to slow its growth into peppery red lettuce heads. But I’m not complaining, because it still tastes great.

Radicchio
We got so much out of our Bok Choy seeds that we decided to try to squeeze in a second batch of winter veggies. I planted more Bok Choy, Red Cylindra Beets, Kohlrabi, Pink Beauty Radishes, Daikon Radishes, Japanese Mustard, and European Mesclun Mix salad greens.  I planted this on the 21st of January, and as you can see, we have some good looking sprouts happening now.

Bok Choy Sprouts

Pink Beauty Radishes

Japanese Mustard Greens

European Mesclun Mixed Greens
On February 2nd my best friend, Kaurie, and I decided that the warm weather wasn’t going to abate, and we’d better just go with it and start our spring seeds. We used our paper pot maker tools


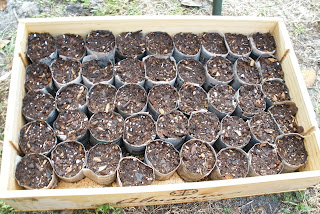
and made a TON of little paper seed pots. We learned that after filling the pot with soil, you should use the tool to compress the soil in the pot. This will help the stability of the pot, and give the seedling something to grow against.

Kaurie's Seed Pots

My Seed Pots

Here’s a list of what seeds I planted:

§         Dwarf Jewel Nasturtium (x1 pot)

§         Dwarf Peach Melba Nasturtium (x1 pot) *These did really well last year. This year we are planting more nasturtiums for both salad and butterfly garden use.

§         Purple Tomatillos (x4)

§         Yellow Wonder Strawberries (x4)

§         Cherokee Purple Tomatoes (x3)

§         Amy’s Apricot Tomatoes (x3)

§         Red Currant Tomatoes (x2)

§         Yellow Brandywine Tomatoes (x2)

§         Black Giant Tomatoes (x3)

§         Black Cherry Tomatoes (x3) *These did well for us last year, so we are replanting them from our saved seed this year. They were our favorie tomatoes from last year!

§         Pineapple Ground Cherries (x2)

§         Regular Ground Cherries (x2) * I didn’t have luck with these last year, but my mom (in Orlando) did. They were so yummy I have to try to grow them again. They grow wild in Florida, so I feel pretty confident we can get them to grow.

§         Purple Beauty Peppers (x3) *Had one plant of these last year and enjoyed them so much we replanted more of them this year from our saved seed.

§         Japanese Eggplant (x1) *We planted this last year and it got a late start but it never died out. We have a large plant now that is ready to flower soon. So since we already have one eggplant ready to produce, I only planted seed for two more.

§         Florida Eggplant (x1)

§         Burgundy Okra (x4) *Planted this last year late in the season and it was wonderful! We bemoaned that we started it so late, because it was a real winner. Very tasty and beautiful to look at too.

§         Fife Creek Cowhorn Okra (x3) *Planted this late last year and promised ourselves to start it early this year.

§         Sweet Red Stuffing Peppers (x2)

We may have gone a bit overboard on all of this, but I just couldn’t restrain myself.

On both January 15th and February 5th Max and the boys went out and procured some composted horse manure from a local stable. We now have two piles like this ready to be spread out in our upcoming raised beds. Hopefully these piles of horse shit will make my dream of delicious and sweet melons a reality.
Mostly Composted Horse Manure
And while I was at it, I impulse purchased these strawberries and cat nip plant at Ace Hardware on February 2nd.  Can you ever have too many strawberry plants? I don’t think so.


And lastly, though this isn’t technically part of our garden, our Red Bud tree is blooming. Seems too early for that sort of business, but I’ll enjoy it any time it feels like blossoming.


Thursday, January 12, 2012

It's GROWING!!!

This is just a quick post to update the growth of the seedlings. The tomatoes have all sprouted and the cabbages are shooting up like weeds. So, 10 days after planting the seeds, everything is growing fast and strong except the Natal Plums. I'm not sure how long germination is supposed to take for those.  Perhaps they are just slow to pop, or maybeI didn't dry or store the seeds correctly. I'm not ready to give up on them yet though.

Leggy Seedlings
Another thing I have learned about using the paper pots is that I should have used the pot making tool to compress the soil in the pots. I think the soil is too loose. Hopefully, that won't negatively affect the growing of the sprouts. Next time, I will fill the pots with soil, and use the pestle to press the soil down into the pot. Live and learn, that's what this garden is all about.

I will be packing these seedlings and my other straggly plants into a large moving truck and shipping them from    hot and humid Palm Beach Gardens, Florida to the much cooler East Palatka, Florida. I'll keep the seedlings indoors until it warms up enough to transfer them to our Spring garden. Once I get settled up there, I will be starting a lot more veggies from seed, as well as reading up on some gardening and seed saving methods. Stay tuned for the updates on that and a lot more in the coming weeks!

Tuesday, January 10, 2012

Sprouting Update!

Just a quick update here: the tomato seeds have all started to sprout. They are teeny tiny, but they are growing. Now all that is left un-sprouted is the Natal Plum. I am wondering if I did not dry out the seeds enough or something. I'll post pics of the seedlings soon.

Monday, January 9, 2012

We Have Sproutage!

I came home from work on Friday night (1/6/12) to find that I had sprouts springing up from most of my newspaper seed pots. The rapini, both cabbages, and leeks all had tiny green shoots poking through the soil. Three days later, I still don't having anything happening in the tomato or Natal Plum pots, but I think they might just be a little behind. The weather has been unseasonably warm lately. There is a high of 78 degrees today. I'm not sure how that is affecting germination, but as always, I'm hoping for the best.

Sprouts!
The tomato and pepper plants from last summer are loving the warm temperatures. I kept thinking I needed to tear out the tomato plant and start fresh in spring, but now it is covered in little yellow blossoms. And the pepper plants have been going to town! I have red stuffing peppers and jalapenos growing, and I think some purple beauty peppers are getting ready to form as well. I am going to try to keep these go-getters through the winter so we can enjoy some winter/early spring tomatoes and peppers.

One word of caution on the paper seed pots: they are delicate. I checked on the tray of pots on Saturday morning to find that one of my cats had tramped through there.  One of the pots that got stepped on was split down the side. You can see it in the forefront of the picture. If you have curious critters or small children, this might be something to consider when deciding to use the paper pot method. But I just stood the pots back up, re-shaped them a bit, and everything seems no worse for the wear. 

Wednesday, January 4, 2012

Seed Organization

I can’t be the only one with this problem – Storing and organizing left over seed. I’ve tried several different methods over the last year, none of which were terribly successful. Initially, I taped the seed packets closed and put them in an old school-supplies box. This was adequate until I needed back in those seed packets. Every time I had to cut the tape to re-open the seed packets, the packet itself degraded a little more. Also, there was no organization to the box. When I needed a specific packet, I had to sort through everything in the box to find it.

Next I put the different varieties of seed packets in their own labeled baggies. I had a plastic sandwich bag for all my different tomatoes, eggplants, peppers, etc. This helped with the organization, but the seed leaked out of the seed packets and soon I had bags of miscellaneous tomatoes, eggplants, and peppers.
So here’s my latest attempt:

Seed book
I tri-folded the seed packets and slid them into clear plastic business card holder sheets. Each sheet holds 10 seed packets. I can actually read the seed packets, and so far, I don’t think that any seed has been able to escape the packets. The image above is my test run. I am going to take it on a trip to share with some gardening friends. If the seeds all stay put, I will put my other (20-30) seed packets in the protector sheets and organize it so that each sheet is dedicated to a plant type (i.e.: berries, carrots, peppers, tomatoes, greens, etc.).I also put white ruled paper behind each sheet and plan to catalog planting /germination notes for each seed I plant in 2012. Hopefully this seed catalog/garden diary will be the answer to my seed storage and organization prayers.

If anyone out there has a good method that works for them, I would love to hear about it. I’ll even post it here (with your permission) to share with others.

Tuesday, January 3, 2012

Time to start seeds?

I took up gardening on a small scale last year. I had many failures, but I also learned a lot from the experience. One of the things I decided to do differently this year is to start the seeds sooner. Here, in Florida, we have a very long growing season, and I missed out on growing some of the cooler-weather vegetable varieties because I didn't start the seeds soon enough. Not so in 2012, I vowed.

So despite the temperature dropping at a steeper rate than it has all season, I decided to get a jump on a few of the cool-seasons veggies. Last year I used the Burpee seed-starting trays to start the seeds. The trays worked very well, but I found that it became difficult to find the trays after the first month of Spring. Instead of being dependent on Burpee this year, I purchased a paper seed pot making tool.

http://www.reuseit.com/store/doityourself-plant-potmaker-from-newspaper-p-3092.html

Yesterday afternoon, as the cold, windy weather was starting to blow in, I made 18 paper pots out of some newsprint junk mail. Not only is the pot-maker made of wood, and therefore completely recyclable, but it also helps the home gardener recycle some of the paper in her home. It's a win-win! I have also read that these paper pots are better for the growth of the seedling, since it doesn't restrict the roots the way the seed starter mesh soil pods can do.

The act of planting seeds on the coldest day of the year seems like an act of extreme hope. It's hard to believe that those tiny, dry seeds will open and grow into plants that can feed us all season. Therefore, I think it's a perfect way to bless the new year.

My Seed Pots


I sowed seeds for leeks, Nero di Toscana cabbage, Coer De Boeuf Des Vertus cabbage, Black Giant Tomatoes, Rapini Broccoli, and Natal Plums. The Natal Plums are a total experiment. I discovered this plant on an urban foraging class of Green Deane's (www.eattheweeds.com). It is a thorny bush type of plant that produces wonderfully scented white blossoms and delicious, sweet/tart flavored, fig-sized "plums" all year long. I picked a dried fruit off of the plant during the class and brought it home with me to harvest the seeds. My fingers are crossed that I can get a couple of these going in my yard. Visions of Natal Plum preserves and dried plums have captured my imagination.

Natal Plum


Everything except the tomatoes and Natal plums are cold-tolerant, so I'm hoping to have them producing before the afternoons get warm. The tomatoes I will keep indoors for as long as possible. I just want to get a few of them started early so that I can get the most out of them all spring and summer long.

If anyone from the South has any advice or recommendations for a newbie just starting to garden in Florida, I would welcome it in the comments of this blog. I scour the internet for helpful tidbits, but most gardening advice doesn't pertain to the extreme South. Thanks for the help, and I'll post an update soon.