Saturday, March 16, 2013

Seasons Keeper

TWITTER logoFor the last couple of years now, I have been working on a better way to store and organize my seeds. Last year I attempted a storage notebook system, and I wrote about it here: http://backtourbannature.blogspot.com/2012/01/seed-organization.html.
That system worked for about a month. It was hard to get the seed packets back in the card holders, and as time went on, the open seed packets deteriorated and leaked seeds.
I decided that this cannot stand. I had seeds rolling around all over the place. I spent a week collecting the seed packets from all their hidey holes and did a massive accounting of what I had.
I am organized by nature, and tools like MS Excel only feed my desperate need to file and categorize. I listed all of the seeds that I had in an Excel spreadsheet and found that I had purchased several duplicates because I didn’t know what I had. Then I looked at that list and decided I would log all of the cultivation information from the seed packets so that I could do away with saving those packets forever. Now I was really getting into it. I added columns for seed source, ID#, cost, date of planting, potential harvest date, season, garden notes, etc. Now I really had something. I could use the spreadsheet to plan each seasons of planting, log when I planted, and schedule on my calendar when to harvest. The days of keeping the seed packets for their information was over!
Seasons Keeper Catalog sill
But if I am not keeping the paper seed packets, how am I storing the seeds? I knew I needed something that was compact, easy to use, and stored the seeds in airtight, freezer-proof containers. I did some research with manufacturers and came up with a storage vial organizer system.
single vial
case spread open
SK Case in Protector
I’ve taken my invention around to seed swaps and showed it to some fellow gardeners. I’ve received a lot of positive feedback about the system, and I had several people ask me to make them one as well. So I’ve decided to Kickstart my invention so that I can offer it to as many people as want it.
Seasons Keeper on Kickstarter
If you aren’t familiar with Kickstarter, it is a website where entrepreneurs can raise money through crowd sourcing to start their projects. Projects only get funded if they raise all of their goal amount. I’ve posted my project on their website and have listed nine backer levels with some great rewards.
If you have ever wished for a better way to keep your seeds, I encourage you to visit my Kickstarter and back my product. You can get a Seasons Keeper organizer, storage vials, and customizable electronic catalog for a pledge of just $30. And you will receive your reward by the end of May (in time for spring planting).

Friday, March 15, 2013

OGS Spring Conference – Beekeeping

I had the privilege of attending the 20th Annual Spring Conference of the Organic Growers School last weekend in Asheville, NC. This is my second year attending the event, and I can’t imagine ever missing it. I learn so much at this conference. Between the wonderful, knowledgeable people, fantastic class topics, and beautiful surroundings, this event has quickly become a highlight of my year.

This year I took classes on Beekeeping, Mushrooms, Goat Cheese Making, and Composting. I thought I should impart some of the things that I learned from these classes for those that didn’t get to attend. So here’s the first in my OGS series of articles – Beekeeping.

I’ve had beekeeping in the back of my mind for a while now. I feel like its important to keep bees for several reasons, but primarily for me it is for pollination and honey. I live in a rural area where there are a lot of small farms and tons of backyard gardeners. I know that having a couple of hives of bees will not only help my garden pollination, but it will also benefit everyone growing in a 3 mile radius of my hives.

Last year at OGS I took a class on mead-making. Since that class I have been cheerfully experimenting with making mead using honey from a local apiary that sells me one gallon of honey for $40. That’s not a bad price at all, but I want to really ramp up my mead making this year, and that is going to get costly at $40/gallon.

So I have a need for producing my own honey and keeping my own bees. That being said, I’ve drug my feet about it because of expense, time commitment, and fear of bees. The classes at OGS have alleviated all of these fears.

Lets start with some basics:

  • One of the best pieces of advice I got from both of the beekeeping classes I took was to get plugged into your local beekeeping clubs/organizations and to go visit other beekeepers hives with them. Both classes stressed the importance of getting to know bees and how to behave around them by apprenticing with a local beekeeper in your area. Not only will you learn a lot of technique, you will also get more comfortable dealing with the bees. This should help me get over my fear of bees.
  • Both classes stressed the importance of being calm when working with the bees. The first workshop recommended doing yoga or meditating right before entering the bee’s space. They claimed that the bees will respond to your energy in kind. Mary Beth Gwynn said that she often stands with her hand on the top of the hive for a couple of minutes to allow the bees to get used to her before she enters the hive.
  • When do you get bees? Well, it depends on your environment of course, but the general rule is that you order bees between November and February. That being said, if you hope to acquire bees through a swarm, that usually happens around April through June.
  • Where do you get bees? You can order packages of bees or nucs of bees from apiaries, or you can acquire swarms or splits from other beekeepers. Everyone seems to agree that purchasing a “nuc” of bees is the best way to get bees. Whichever source of bees you choose, you should get two hives of bees as a minimum.
    • Nucs are small, established colonies of bees that can be slipped into your hive and are ready to go. They are bees that have already been living and working as a hive.
    • If you buy packaged bees, you are getting an odd assortment of bees from many different hives and a queen none of them have ever met before. The quality of the bees is in question with this method, and it can take a while for all of the bees to decide to work together.
    • Splits of bees can be acquired from your local beekeeper who has a full hive and wants to avoid a swarm. You can find out about getting a split through your local beekeeping association/club.
    • Swarms are essentially free bees. Get on the swarm list through your local beekeeping association or extension agency. They will call you when they are going out to get an unwanted swarm from someone’s home. You show up, collect the bees (a Nuc box is perfect for this), and take them home to your awaiting hive. This is a great way to get free “survivor” bees.
  • What are “Survivor Bees”? The classes I took on beekeeping were on “Natural” beekeeping. Meaning no medications, pesticides, or chemicals are used on the bees. This style of beekeeping is also known as “Live and let die,” meaning that only the strong bees will survive to breed. If your bees die, well, then they weren’t the strong bees you want to procreate. Natural Beekeepers hope that if enough beekeepers practice natural beekeeping, eventually bees will be bred for natural resistance to varoa mites and other diseases.
  • Expense – there are predominantly two types of bee hives: Langstroth hives and Kenyan Top Bar hives. The two are very different and cost is just one of the ways they differ. Top Bar hives are significantly cheaper than the more classic Langstroth boxed hives. Here’s why:
  • Langstroth Hives are the classic bee boxes you see whenever you think of beekeeping. Generally there is a large brood box topped by a series of further brood frames and honey frames. This style of beekeeping yields a lot of honey and allows for a large, expandable hive.

031513 lang hive

A downside is that these boxes get very heavy when full of comb and have to be moved to inspect the lower boxes. These boxes use frames with starter comb that the bees build upon. To harvest the honey the frames are removed, the caps are sliced off and the frames are spun in a honey extractor. The empty combs are then returned to the hive so that the bees can refill them with honey. This is a great energy saver for the bees, but can also keep diseased wax in the hive.

These hives usually have 8 or 10 frames per box, and are usually 4 or 5 boxes high for a full hive of bees. As production of honey ramps up, additional boxes with the frames can be stacked on top to help the bees expand their production.

031513 diagram of Lang hive

  • Kenyan To Bar Hives have one long box that is shaped like half a hexagon. Viewed from an end it looks like this: \_/. Then there is some sort of slightly pitched roof that just rests on top of the hive.

031513 TBH

Instead of frames, a TB hive uses bars that are set on top of the hive. The bees make their comb directly on the bars. The main job of the beekeeper with this style of hive is to ensure that the bees build straight combs and to reshape any curved comb. The bees will naturally build their brood combs on the first couple of bars, and will leave the honey combs to the rest of the bars.

031513 empty top bar hive

One of the downsides of this type of hive is that you will be able to harvest a lot less honey. This is because you will not be reusing comb, so the bees will spend a lot of their energy making comb. it takes 8 pounds of honey to make one pound of comb. The comb is not reused because they are more fragile hanging from the top bar.

031513 bees building combe in TBH

To extract the honey, the comb is crushed and strained. Tom Knaust (who taught the Top Bar class I took) recommended taking two 5 gallon bucked, drilling holes in the bottom of one bucket and stacking that bucket on top of the other. Then place a strainer on top of the buckets and crush the comb in the strainer. This method allows you to have strained honey and a bucket full of bees wax.
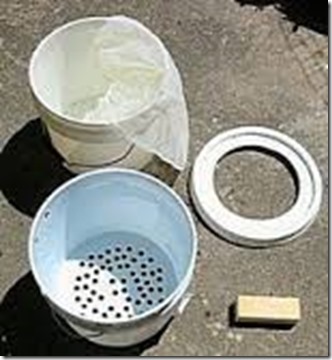
TB Honey Extraction

So this method will provide you with less honey, but it is also a lot cheaper to get started because you can construct your own hives and cheaply extract the honey. Cost estimates for starting out with two hives runs roughly $300 for Top Bar hives and $1,000 for Langstroth hives.

Other benefits of Top Bar hives is that they tend to house happier, healthier bees. Top Bar bees seem to be less susceptible to diseases. They tend to be happier bees, because you are not changing their temperature when checking on them, the way you are when you are breaking down the chimney of the Langstroth hive.

After taking a class on both I think that I will try Top Bar hive beekeeping. It is a method that I can start cheaply and right away. It does take a little more time and management on my part, but right now I have more time than I have money. Also, I only want a couple of hives for home use, so not harvesting as much honey as I might with a Langstroth hive is not such a large detraction.

The following are a series of resources I acquired at the the classes:

BOOKS

The Practical Beekeeper (several volumes) by Michael Bush. Bush also provides a lot of fantastic content for free on his website: www.bushfarms.com/bees

Natural Beekeeping: Organic Approaches to Modern Apiculture by Ross Conrad.

Honeybee Democracy by Thomas Seeley

Top Bar Beekeeping: Wisdom & Pleasure Combined by Wyatt A. Mangum, PhD. This is THE comprehensive text on keeping Top Bar hives.

The Barefoot Beekeeper by P.J. Chandler

Top Bar Beekeeping by Les Crowder

WEBSITES

http://www.biobees.com/ – source for free step-by-step instructions on how to build a horizontal top bar hive, and loads of information about top bar beekeeping.

http://www.anarchyapiaries.org/ – is filled with interesting thoughts and lots of info on keeping bees in alternative hive structures.

http://www.beesource.com/ – all things bees

http://www.bushfarmscom/bees.htm – a wealth of experience-based knowledge with great photos.

http://www.tbhsbywam.com/ – top bar info and links to buy the bible of top bar beekeeping by Wyatt Mangum (see books above.).

http://www.holybeepress.com – This is Debra Roberts’ (who taught my beekeeping workshop) website

http://www.fortheloveofbees.com – this is bee book author, Les Crowder’s website.

http://www.naturalbeekeepingtrust.org – home of the Natural Beekeeping Trust

http://www.brushymountainbeefarm.com/Resources – offers fantastic text resources, pictures, and video classes for beekeepers from beginner to commercial beekeepers.

https://www.youtube.com/user/FatBeeMan – this is Don Kuchenmeister’s YouTube channel. He has tons of practical, how to videos.

FORUMS

http://www.beesource.com – go to “The Exchange” for their forum.


Thursday, February 28, 2013

My Garden’s Been Poisoned!

No joke, my garden has been poisoned. And as far as I can tell, I have Dow Chemical to ultimately blame.

I live in Florida and our ground is just sand. I have to amend and create my own garden soil. So I compost, add fish emollient, and pick up loads of horse manure from a local farm.

A couple of months ago, my neighbors and I got a load of manure from the horse farm to use in our spring beds. We have been doing this for years with great success. We pick up a trailer load of partially composted horse manure, bring it home, finish composting it, and then use it as the soil in our garden beds. Well, the manure has been composted, and we began filling our beds with it.

I used the new compost in a bed that currently is half full of greens. I spread the compost in the empty half of the bed and direct sowed Wando Peas, broccoli, and carrots. The peas came up first and looked a little weak, but it’s been cold and dry, so I chalked it up to that. The broccoli came up and looked good. The carrots never even sprouted. As the peas grew, it became obvious that something more than dry weather was the problem.

Herbicide Poisoned Pea Plants

At that same time, my Feb/March issue of Mother Earth News arrived. In it was an article called, “Killer Compost Update: Herbicide Damage Still a Major Problem.” The picture that was displayed with the article caught my attention because it looked just like my peas.

022813 burned pea plant 3

The article explains that two Dow AgroSciences herbicides (picloram and clopyralid) are being found in composts and animal feeds. My heart sank. I had the terrible suspicion that my new compost was contaminated.

I called my neighbor to see if she had used the new compost yet, and if so, what her results were. She walked me over to her bed of English Peas. They were all dead or burned and wilted. We had become the victims of Killer Compost.

The horse farm does not use herbicides themselves, so they were introduced either through the hay or through the Purina horse feed. Either way, our ton of compost is toxic and we have no way of knowing if any alternative sources of manure will be herbicide-free. If the herbicide was introduced through the Purina feed (as Mother Earth explains is a very good possibility) we will have to find an organic farm that feeds only organic grains, grasses, and hays.

There is no remediation for picloram or clopyralid once it has been introduced. It will remain active in the soil for years. My neighbor and I have to dig up our beds and remove all of the toxic compost. What we do with it then is up for debate. It survives digestion and hot composting, so there doesn’t’ seem to be any way to break it down. We will either spread it on walkways or burn it.

Mother Earth is calling for these persistent herbicides to be outlawed entirely before it becomes impossible to grow organically. Please join their fight with me. Write to Richard Keigwin, director of the EPA’s Special Review and Reregistration Division at keigwin.richard@epa.gov to let him know about your concerns.


Thursday, February 21, 2013

Seed Swap

One of the great things about seeds is that they are so easy to save and swap with others. I love trading seeds with my friends and neighbors. It allows us to broaden our plant varieties without stretching our budgets.

I recently got the opportunity to swap with a friend of mine before he left for a vacation. He had already started the seeds, so instead of baggies of seeds, I got two trays of seedlings! The first tray had bush beans and English peas. I just started peas in my beds, so I am really looking forward to getting these seedlings in there and having some succession harvesting ahead of me.

022113 sprouts 1

The second tray had watermelon, tomatoes and cucumbers.

022113 sprouts 2

Clint was afraid that these seedlings wouldn’t survive his absence while he is on vacation. So I swapped him seeds for his seedlings that he could plant when he returns. I gave him some corn, ground cherries, peppers, and Dragon Tongue bush bean seeds.

Seed saving and swapping has a long and important history. It has been vital to the preservation of heirloom varieties of seeds. Heirlooms are necessary because they represent culturally diverse and endangered crops and agricultural freedom. A diverse seed catalog is a cornerstone of food security. If growing seed that has been selected for your region, soil, weather, and superior flavor is important to you, then you should definitely consider taking part in this long held tradition.

Seed saving and swapping is the best way to break the hold that Mega Corps like Monsanto and Dow have on our agriculture. To further support conserving and promoting heirloom seeds, consider joining the Seed Savers Exchange. Not only do they do great work to support an enormous variety of ancient seeds, but they also offer members fantastic educational opportunities and a good discount on seed purchases.

So start talking to your friends and neighbors. Find out what kind of seeds they have laying around the house. Seed swaps are fun and economical, and they are good for plants too.

Blogger Labels: Swap,friends,tray,bush,English,succession,corn,Dragon,Tongue,history,preservation,Heirlooms,freedom,catalog,food,region,tradition,Mega,Corps,Monsanto,agriculture,Exchange,Find,plants,Savers,members,neighbors,peas,heirloom

Sunday, February 17, 2013

Seed Starting for Spring 2013

Well, its nearly spring here in Florida, and with days that have highs in the 80s, some might contend that spring has already sprung. We have at least on quick freeze likely to hit us this weekend, and then I think we will be officially on a warming trend. And if that’s true, then there is no time like the present to get my spring seeds started!

Last year I bought a tool to make my own paper seed starter pots. I blogged about it here:Time to start seeds? 

Yesterday I had an afternoon free and began making my fully biodegradable paper pots and starting some seeds. Here’s what I have done so far.

  • I made 64 little newspaper pots. I love this method because it recycles my junk mail and makes pots that won’t bind root systems.

021313 paper pot

  • Then I planted the following organic heirloom seeds:

021313 Seed Starts 1

    • 4 Kerala Red Amaranth
    • 4 Love Lies Bleeding Amaranth
    • 2 India Jwala hot peppers
    • 2 Tam Jalapeno peppers
    • 4 ground cherries
    • 4 Dragon Tongue Beans
    • 4 Mammoth Sunflowers
    • 4  Moonwalker Sunflowers
    • 4 Burgundy Okra
    • 4 Purple Beauty Peppers
    • 4 Sweet Red Stuffing peppers
    • 4 Friariello Di Napoli peppers
    • 4 Amy’s Apricot tomatoes
    • 4 Homestead tomatoes
    • 4 Black Cherry tomatoes
    • 4 Yellow Wonder Strawberries
    • 4 Jewel Nasturtiums

021313 Seeds Starts 2

A lot of these seeds are new to me, so it will be a real experiment to see if I cultivated them correctly. I am really excited to be growing Amaranth this year. I have been reading about it’s super-food status, and I love the idea of growing something that I can eat the leaves and harvest grain. I plan to devote the bed I have in the front yard to the Amaranth because I think it will be pretty enough to proudly display.

I am keeping the seed starts in my little 3-Shelf greenhouses while it is still cold at night. I plan to do another 64-100 more starts to get me through spring and summer. I’ll update when I get those going too.

Isn’t this the best time of year? Don’t you just love all of the possibilities? Every one of these little pots of dirt represent a potential harvest to me. And I am so excited to find out if my investments will profit. It is amazing to think that these small trays will develop into whole large beds of plant life in the coming months. I can’t wait to see them all grow up!

Windows Live Tags: Florida,trend,Last,tool,paper,starter,Time,afternoon,Here,newspaper,method,Kerala,Amaranth,Love,Lies,India,Jwala,Jalapeno,Dragon,Tongue,Beans,Mammoth,Sunflowers,Moonwalker,Burgundy,Okra,Purple,Sweet,Friariello,Napoli,Apricot,Homestead,Black,Cherry,Wonder,Strawberries,Jewel,Nasturtiums,food,status,grain,yard,Shelf,possibilities,dirt,investments,life,systems,greenhouses,tomatoes
Blogger Labels: Florida,trend,Last,tool,paper,starter,Time,afternoon,Here,newspaper,method,Kerala,Amaranth,Love,Lies,India,Jwala,Jalapeno,Dragon,Tongue,Beans,Mammoth,Sunflowers,Moonwalker,Burgundy,Okra,Purple,Sweet,Friariello,Napoli,Apricot,Homestead,Black,Cherry,Wonder,Strawberries,Jewel,Nasturtiums,food,status,grain,yard,Shelf,possibilities,dirt,investments,life,systems,greenhouses,tomatoes

Friday, February 15, 2013

It’s Sauerkraut Season


Here in Northeast Florida, it is cabbage season. All around me are fields full of bright green, dark green, and purple cabbages. They are in such an abundance that I do not bother to grow any myself. I do, however, buy them from the local produce stand (The County Line) and make delicious, lacto-fermented Sauerkraut.

Making lacto-fermented Sauerkraut is super easy. Basically, you just let the cabbage and brine sit for a week. Here’s the details:

  1. You will need a large container to pound the cabbage in, a container for fermenting (I’ll discuss this later), a potato masher, sea salt, spices (optional, but I like celery and caraway seed and black sesame seed).
  2. Shred or thinly slice a couple of heads of cabbage. It can be any cabbage you like. I prefer to use the beautifully colored red cabbage and the crunchy savoy cabbage for my sauerkrauts.
  3. As you add the sliced/shredded cabbage to the large container, lightly salt each layer and give it a good pounding with the potato masher.
  4. Continue layering, salting (and spicing if using) and pounding until you run out of cabbage.                            021213 crushed cabbage
  5. Let the cabbage sit in the container for several hours. Give it a good pounding every 15-30 minutes. You are looking for the cabbage to start expressing its water. You want to get as much water out of the cabbage as possible.
  6. At the end of the day or when you feel you have a good brine started, begin to pack the wet cabbage into your pickling container. I use The Picklemeister glass fermentation jar. This is a great contraption. It has a gallon capacity  and a fitted airlock so you don’t have to worry about contamination. You can use a regular jar and cover it with cheese cloth, but you will need to remove the scum from the top of the surface every couple of days. With the Picklemeister, this is not necessary.
  7. As you add the cabbage to your fermenter, make sure you mash it down very tightly. Hopefully, there will be enough natural brine to cover the top of the cabbage in the fermenter. If not, add a cup or two of saltwater solution (1tablespoon per 2 cups of water should be sufficient) to the cabbage.
  8. Weigh the cabbage down so that it is fully covered by the brine. If you are using an air-locked fermenter, cover it and add the airlock now.021213 Sauerkraut
  9. Next, you just wait. Give the cabbage a taste every day or so to track how the fermentation is going. Here in Florida, where it is fairly warm, it usually only takes 5-7 days to reach a fully mature sauerkraut.
  10. Once you reach a taste that works for you, move the sauerkraut to the refrigerator. This will keep the bacteria from continuing to work and making the kraut too sour. As long as the cabbage remains under the brine the kraut will remain delicious and full of beneficial lactobacillus. You may also can the sauerkraut at this point to keep it shelf stable, but this will kill off the beneficial bacteria.

I hope you give this easy fermentation craft a try. It will turn even a hot dog into a mouthwatering meal!

Wednesday, February 13, 2013

The Organic Growers School Conference

I am planning a trip to the Organic Growers School Conference again this year. I can’t wait to take some courses on backyard beekeeping, mushroom growing, and cheese making!

Last year I went and it was a transformative experience. I learned so much that has continued to enrich my life, and the lives of those I care about. I knew then that I would be making the OGS Conference a yearly experience.

There’s still time to register. Go to the OGS website for more information on the class and workshop schedule. I’m caravanning up from Florida with some of my girlfriends. I hope we see you there!